A “Personal Virtual Private Network” (PVPN)
I don’t quite remember if it was the first time I had configured a VPN terminator (probably had already done some PPTP work) but I distinctly remember my first brush with IPSec. It must have been around 1998 or 1999. Can’t remember the manufacture for sure, but suspect it was Cisco. That was when real paper manuals were included, and boy was that a case where RTFM was required. And the reason I remember this, is because how incredibly confusing, prone to misconfiguration, and all around not really fun it was. Fast forward to a weekend in early july 2022 when I discovered Wireguard a completely new take on VPNs that make it simple and lightening fast.
Before we get into the implementation details, let me list the reasons why I find Wireguard so cool:
- Simple config: super easy config utilizing simple public keys
- Fast: it connects on all my clients so fast it almost hits me in the face
- Security: it has dramatically increased my security two ways:
1. I now have my mobile always connected to the VPN and have my DNS resolution pointed to my Pi-hole securing my internet surfing on the go
2. I lowered my internet surface exposure to only a single high UDP port. I previously had 6 TCP ports opened (ssh, CardDav, CalDav Synology NoteStation, Synology PhotoStation, and Synology CloudStation) and these were being scanned daily [1]
- Mesh VPN: it is possible to use as a hub and spoke, but also possible work as a mesh having clients connect directly without having to pass all the traffic through a central node. I have not yet taken full advantage of this functionality but have a potential use case for summer and vacations that I need to explore.
So on one beautify saturday morning in july I awoke before anyone in the house and had a wonderful time setting up Wireguard for the first time, and everything just worked (well, kinda. I actually lost my offsite backup node, but that was not Wireguard’s fault persay, more a collateral damage as I needed to update to a newer version of Debian and on reboot it had a problem and went into a safe run level that until I was able to physically connect to the device I could not recover it)
Setting up the server
My home node is a Rapberry Pi 4 running a 64 bit version of Debian. Installing Wireguard was as easy as using apt-get (Note that it is only 332kB!):
pi@ersa:/var/log $ sudo apt-get update
pi@ersa:/var/log $ sudo apt-get upgrade
pi@ersa:/var/log $ sudo apt install wireguard
Reading package lists... Done
Building dependency tree... Done
Reading state information... Done
The following additional packages will be installed:
wireguard-tools
The following NEW packages will be installed:
wireguard wireguard-tools
0 upgraded, 2 newly installed, 0 to remove and 1 not upgraded.
Need to get 97.1 kB of archives.
After this operation, 332 kB of additional disk space will be used.
Do you want to continue? [Y/n] y
Get:1 http://deb.debian.org/debian bullseye/main arm64 wireguard-tools arm64 1.0.20210223-1 [88.9 kB]
Get:2 http://deb.debian.org/debian bullseye/main arm64 wireguard all 1.0.20210223-1 [8,164 B]
Fetched 97.1 kB in 0s (988 kB/s)
Selecting previously unselected package wireguard-tools.
(Reading database ... 39998 files and directories currently installed.)
Preparing to unpack .../wireguard-tools_1.0.20210223-1_arm64.deb ...
Unpacking wireguard-tools (1.0.20210223-1) ...
Selecting previously unselected package wireguard.
Preparing to unpack .../wireguard_1.0.20210223-1_all.deb ...
Unpacking wireguard (1.0.20210223-1) ...
Setting up wireguard-tools (1.0.20210223-1) ...
wg-quick.target is a disabled or a static unit, not starting it.
Setting up wireguard (1.0.20210223-1) ...
Processing triggers for man-db (2.9.4-2) ...
then I enabled IP forwarding by uncommenting this line in /etc/sysctl.conf:
net.ipv4.ip_forward=1
restarting something so the IP forwarding took hold:
pi@ersa:/var/log $ sudo sysctl -pnet.ipv4.ip_forward = 1
generated some keys:
root@ersa:/var/log# cd /etc/wireguardroot@ersa:/etc/wireguard# wg genkey | tee privatekey | wg pubkey > publickey
setup config file /etc/wireguard/wg0.conf (Note you will need to get the private keys from the files generated above and from each of the clients):
[Interface]
PrivateKey = xxxxxxxxxxxxxxxxxxxxxxxxxxxxxxxxxxxxxxxxxxxx
Address = 10.10.10.5/24
PostUp = iptables -A FORWARD -i wg0 -j ACCEPT; iptables -t nat -A POSTROUTING -o eth0 -j MASQUERADE
PostDown = iptables -D FORWARD -i wg0 -j ACCEPT; iptables -t nat -D POSTROUTING -o eth0 -j MASQUERADE
ListenPort = 1234

[Peer]
PublicKey = xxxxxxxxxxxxxxxxxxxxxxxxxxxxxxxxxxxxxxxxxxxx
AllowedIPs = 10.10.10.100/32

PublicKey = xxxxxxxxxxxxxxxxxxxxxxxxxxxxxxxxxxxxxxxxxxxx
AllowedIPs = 10.10.10.101/32
then i fired it up:
root@ersa:/etc/wireguard# wg-quick up wg0
[#] ip link add wg0 type wireguard
[#] wg setconf wg0 /dev/fd/63
[#] ip -4 address add 10.10.10.5/24 dev wg0
[#] ip link set mtu 1420 up dev wg0
[#] iptables -A FORWARD -i wg0 -j ACCEPT; iptables -t nat -A POSTROUTING -o eth0 -j MASQUERADE
and enabled it for autostart:
systemctl enable wg-quick@wg0
Setting up on a mobile
installed Wireguard via F-Droid
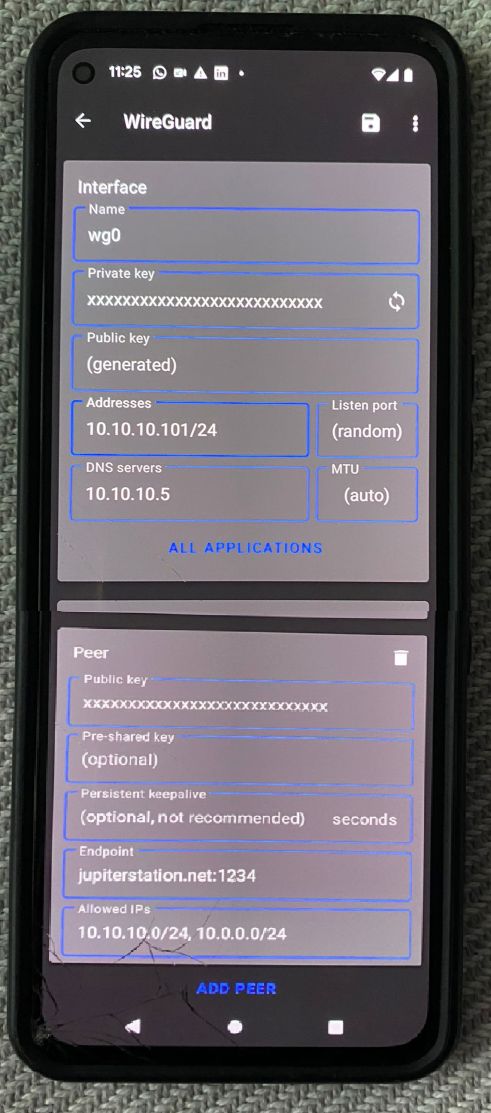
configured the app (please note the picture is kinda weird as I had to use another phone to take the pictures because Wireguard is so secure it disables taking screen shots):

Note: this configuration only will route my home network traffic through the VPN. If you want all your traffic to go through the tunnel setup an all network mask like this in the “Endpoint” section:
0.0.0.0/0
Setting up on a windows device
Downloaded the windows client from Wireguard
next, next, next install.
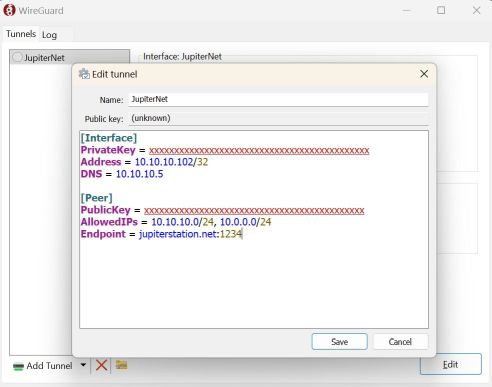
Then setup the configuration:

and clicked the “activate” button and it connected!
Opening it up to the world
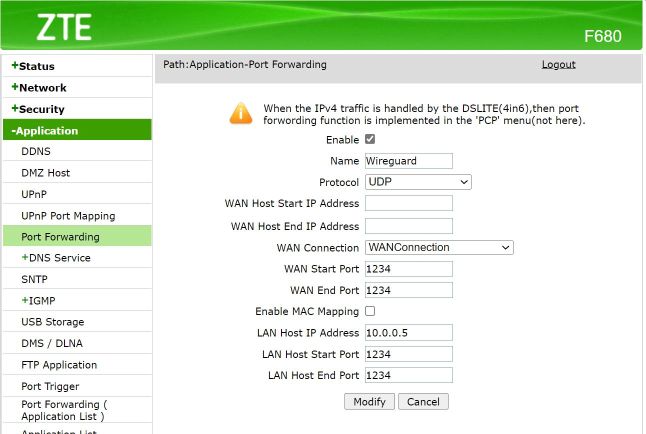
And then I opened it to the internet setting by setting up port forwarding on my router:

and that is all folks! I think it has taken me about twice as long to write this post as it did for me to get Wireguard working allowing me to create my own PVPN.
References
And here are some sites that helped me out:
- main page: https://www.wireguard.com/
- good intro onto how to set it up: https://spin.atomicobject.com/2020/05/24/private-network-wireguard/
- another guide with step by step: https://upcloud.com/resources/tutorials/get-started-wireguard-vpn
- Synology packages (currently not using these): https://github.com/runfalk/synology-wireguard
[1]
example of connection attempts against my internet facing SSH on just one day:
grep "Failed password" /var/log/auth.log  | wc -l
104
ufff. 104 attempts just today. 25 times attempting root, and 78 other users:
grep "Failed password" /var/log/auth.log |  awk '{print $9}' | sort | uniq -c
1 bin
78 invalid
25 root
and the list of attempted users is reveling about what the baddies are trying to exploit:
26 141.98.10.94
1 abc123
1 AboutIT
1 acc
1 active
21 admin
1 agni
1 alex
1 amri
1 ansible
1 Arman
1 asdf
1 bobby
1 bpadmin
1 brayden
1 deborah
1 elemental
1 euroexpert
1 farposter
1 fastnet
1 fmaster
1 guest
1 hadoop
1 hduser
1 hudson
1 igor
1 itsuib
1 jaime
1 josiah
1 kyivstar
1 lab
1 MBbRB951
1 modelsfan
2 noc
1 nologin
1 nsroot
1 optiadmin
1 oracle
1 piotrd
1 rootroot
1 rust
1 shkpbooks
1 teamspeak
1 techsupport
1 tecnico
2 test
1 tomcat
1 ubuntu
1 ultra
1 user
1 user1
1 userr
1 vivo
1 walter
1 www
1 xml
1 zabbix
Thanks for reading and feel free to give feedback or comments via email (andrew@jupiterstation.net).